Designing For Title
Peachy Keen Stamps Alumni

I've Been Published!

Scrappin' Navy Wife
Copyright
Copyright Information All content included on my site is copyrighted Emma v. Aguilar. My projects & photos are shared for your personal inspiration & enjoyment only & may not be used for publication, submissions or design contests. So please don't claim my work as your own. Thank you.

Tuesday, July 31, 2012

I'm Baaaaaaaack!;)

Wow! It's been a while since I've been able to say this, "Hello to my SWEET Creative friends"! It feels AWESOME to be back to my blog again!  First of all before I begin, I just want to give a HUGE shout out to my FABULOUS design team & my sweet Guest designers as well for doing an AWESOME job w/my blog while I was away! They all came through for me when I needed them the most & for that, I am VERY GRATEFUL to have each & everyone of them be a part of MY team!;) I WUV YOU ALL!:)
To all of my sweet bloggy friends, I was overwhelmed w/joy & very appreciative of how many of you reached out to me through emails & facebook messages while my son was sick! I never seen so many cards in my mailbox daily EVER!! The BEST thing for me was to see the sweet smile on my son's face as he read every single card that he received....simply "Priceless"! You ALL sure know how to make my family & myself feel like I know each & everyone of you, even though we all have never met in person! This is why I LOVE what I do & I appreciate ALL OF YOU! I wanted to ESPECIALLY thank my parents who helped take care of my Anthony & all 3 of my furbabies: Angel, Scrappy & Princess while we spent all those days in the hospital!;) 
Well, this wasn't the summer I actually planned on:( For those of you who are brand new to my blog, I took some time off to take care of my son (Baby Aaron). Back in June, he was diagnosed w/a rare disease called "Kawasaki Disease". You can read all about it HERE. It was rare that my 12 year son had it especially when it's most common in younger children. Let's just say that I was relieved that it was "Kawasaki" & not Leukemia.  My heart broke when the doctor first told us that he had all the signs of Leukemia :'(. When you are told this about your child, your whole world just turns upside down & nothing else matters. After seeing several doctors & specialist, I am THANKFUL they found out what was wrong with him & they treated him for this Kawasaki Disease! I swear I didn't think my baby had anymore blood left in him because he went through SEVERAL tests. The one thing I do have to say is that we had the BEST team of doctors, specialists, nurses & even the BEST physical therapist! They were there EVERY SINGLE time I had questions, they took the BEST care of him & I was VERY GRATEFUL for that! The little bed I even slept on every night was actually comfy! lol.... Although, there were several nights that my son would just cry because he felt SO HORRIBLE, that I actually just slept in his hospital bed w/him!;) I'm sure all of you Mom's can agree w/me on that! At home when our kids cry, don't you go lay down w/them too? Sometimes just laying next to them makes it all better!;) 
It was GREAT to finally bring him home. Before we left, our doctor was very specific that for the next 8 weeks, he could NOT do anything strenuous to make his heart rate go up! Do you know how hard that is for a 12 year old boy??? Let's just say that our 8 weeks is ALMOST over & I think I did a good job on keeping him busy & CALM! lol...... I definitely kept him busy so he wouldn't feel so bad that he couldn't do much of anything that any 12 year old boy would be doing! At the end of August, he will be getting another echo-cardiogram to make sure he did not develop any aneurysms. I can assure you that I will be able to actually sleep at night after they tell us that he is PERFECT again!;) I am thinking POSITIVE thoughts!;) 

Well, it has been one rough road for us here! Just seeing my son "literally" fighting for his life has been the most HARDEST thing EVER to see. I am GRATEFUL that I have a STRONG family! Last year my hubby was fighting for his life & this year, my son....... When something like this happens, you have a whole different perspective on life! I want to tell ALL of you to HUG your children & family members & tell them that you LOVE them EVERYDAY because you never know when life throws you a curve ball!;)

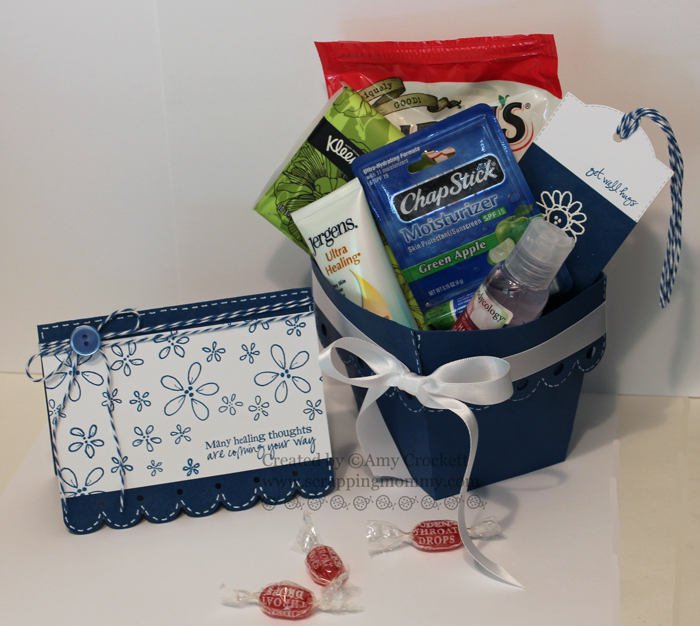
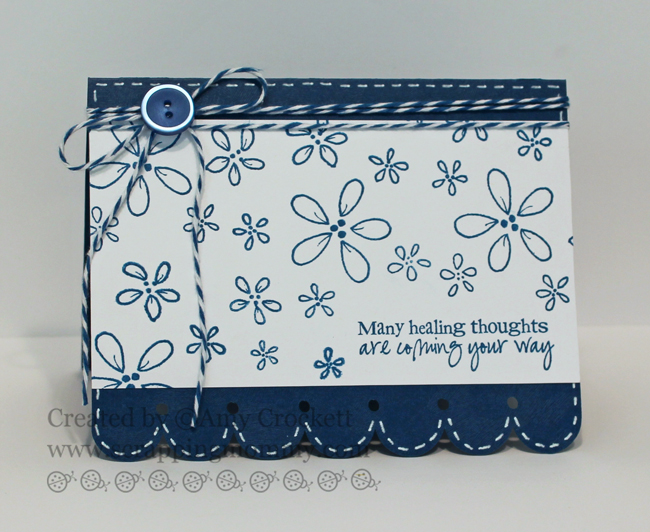
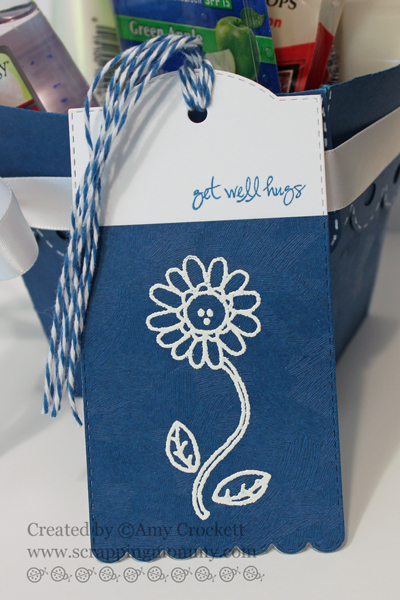
Here are a few pics for ya!;)
Here is the pic of my baby on the day he was told he can go home!!!;) Did you notice that AWESOME "Get Well Soon" sign? One of my sweet DT members Miss Cassandra made that for him! Since he wasn't able to play in his all-star game w/his team, his coach gave my hubby his uniform so he can wear it on the way home! 

Here are a few things we have been doing to make the best of our summer!
We spent alot of time here in our yard! I tried to make it special for him by putting up the lights, the pool & I at night, we even roasted marshmellows! hehehe! (my favorite part)!

Here are ALL 5 of my babies!:) My furbabies were ecstatic to see Baby Aaron finally home! So you know I just HAD to get a picture of ALL of them! On the left is my "Anthony", he is holding "Scrappy". On the bottom left is my sweet "Princess" & there is my "Baby Aaron" & he is holding my "Angel"! Aren't they ALL just the CUTEST EVERRRR!

We also took the boys to see their FAVORITE team "The Giants" play AND they won that night too!

Yep! that is my hubby in the back being silly!! I just LOVE that man to pieces!!!

Now I do have to admit, we have been here a FEW times already!;) Who doesn't like a GOOD ice cream from the Ghiradelli Chocolate Factory! RIGHT????

Last but certainly not least, here is my beautiful family all together celebrating my Hubby's birthday! I am VERY BLESSED to have my family all together celebrating this special day! These 3 guys mean the WORLD TO ME & I am one lucky lady to have all of them in my life! They complete me!!!

 I will have a project here for you tomorrow!  Thank God for my hubby who convinced me that I needed to get to my blogging again! He knows that my crafting is my "therapy"! Have a FABULOUS day my sweet friends & it feels GOOD to be BACK!;) Thank you for visiting my blog!  Big HUGE xoxo! 

Guest Designer: Glora!

Hello My Creative Time fans, this is Glora from Glora's Crafts, and I am guest designing for the super sweet and talented Miss Emma today. I'm so glad that she has been able to have this time to be with her family while Baby Aaron has been recovering.

Today I have a tag to share with you. A friend of mine recently had surgery, and I wanted to drop her off a loaf of banana bread with this tag attached to it.


I LOVE how well My Creative Time products work together. It made this tag a piece of cake to make, and I think it will really brighten my friend's day. I used the Tag Dies for the tag, the flower image is from the Bloom Where You are Planted stamp set, and the sentiment is from Pain Pain Go Away.

I started with white cardstock, and I colored the image with Copic Markers. Then I inked up the background with Tim Holtz Distress Ink. To finish it off, I used some orange twill ribbon and just a bit of bakers twine.

Thanks for stopping by today, and I hope you will continue to keep Emma and her family in your thoughts and prayers! Hugs- Glora

Monday, July 30, 2012

Guest Designer: Ruthie!

Happy Monday!

Ruthie from SeptemberNinth here! I am guest designing today for Miss Emma.  Just a few more days and things here on her blog will be back to the regular schedule. I can't wait to see what crafty goodness she has in store for all of us!

I have a fun kid's birthday card to share with you today.


 The bee is supposed to be singing... does he look like he is singing? I made this card for a friend's little boy; he is obsessed with bees. They have several bee hives on their property, so he's very knowledgeable on the subject.  He's definitely my "go to" guy whenever I need info about bees. Anyway, I am hoping that he likes his card!


 For this card I used the following items:
Papers: PaperTrey Ink, Core'dinations, and My Minds Eye's, Kraft Fun Day Collection
   White Pen: Sakura Gelly Roll, Med.

Thanks for stopping by! I hope you have a wonderful day!
 

Saturday, July 28, 2012

Guest Designer: Trell!

Hello everyone!  This is Trell, from Polka Dots, Paint, & Cake Batter. Today I am filling in for Emma while she spends time with her family. I have a card today that can probably be described as clean and simple. I will let you all be the judge.

Before I share my card, I’d like to share what inspired me to make it – a toddler dress!

Chevron DressMitered Stripe Tunic

Chevron is very popular right now, and I love the color combination so I decided to see if I could make it in card form.

DSCF0202

DSCF0203

I started with a Soft Stone card base and I used my ruler to draw a line down the center with pencil. I worked from the bottom of the the card, to the top, starting with Hibiscus Burst. The blue I used was Pacific Point from Stampin’ Up, and the yellow is Lemon Tart.
I stamped my sentiment from one of my favorite My Creative Time sets, Gift Card Sentiments, with Versafine Onyx Black ink. And I tied a bow with Hibiscus Burst Saddle Stitch ribbon. Came together in no time!

Thanks for stopping by, have a blessed day!

Friday, July 27, 2012

My Creative Time for me Friday Tip of the Day

Hello everyone! Debbie from "Bugjuiced" here for another GD spot and Friday Tip of the Day!!! WOW where has this month gone! I can't believe we are almost in August! I really had a lot planned for this month and the time has just gotten so past me! 

I have a cute quick little project to show you today and its a summer time fav with so many people even if you don't camp!

SMORES!!!! 
But with a twist because they are Smores POPS!!

I for one can't get enough of seeing cake pops. Some people just decorate them so cute! I wanted to enjoy them in a much simpler fashion and they are so so yummy!!! These would be so cute in Emma's Lollipop die cutout!!!!

I used Emma's (and one of my fans!) Circle & Scallop dies to cut out my sayings. I made a few with the cute Teeny Tag Greeting set also and stamped them with various sayings from the set. This is also one of my favorite sets! I ended up printing some sayings because I wanted it to be smore related! I used some cute Chocolate Chip twine for the tying of the pops. I wish I could show you this whole pic and the container I made to put them in but its for a upcoming challenge on another day! 


 CLICK ON PICS FOR LARGE VIEW
This pic here I just stuck them on the top just to photograph
the sayings. Then I moved the sentiment to the top as you see below to stick in the box I made. 

Here is the pic below where I had made a cute little box and stuck them in
the top of it. It turned out so cute but that is a post I am 
on July 31 for a project challenge for another DT I am on so I can't show the finished project! 

Another set I did I used the Teeny Tag Greeting stamp & Die set I cut the little box I put one in below from the Close to My heart Art Philosophy set. 


I bought Jumbo Marshmellows (they are really big ones! Much bigger than the usual large)

Lollipop sticks from Michaels cake section Michaels 

Cake pop bags from Michaels which come with ribbon also!

Melting Bakers brand chocolate (comes in a box at grocery)

Graham crackers (I got the whole ones and put in a baggy and rough crushed) I wanted some large and small chunks on mine. You can also buy already crushed but then how will you take out your weeks frustration on already crushed graham crackers! :)


I just took 3-4 squares of the chocolate and put them in a microwave bowl and "nuked" those puppies until it was nice and melted. (Stop and stir a bit in between)

I dipped my stick in the chocolate and then stuck it in the marshmallow to give it a good hold. Then rolled my marshmallow around in the chocolate and then rolled in the graham crackers! WOW if you eat one right away it is so yummy also! Since the chocolate is still warm! They look super cute in the package!


Now, my tip of the day is all about Gift Giving

Before you know it we will be looking for ways to make Christmas gifts because everyone is always looking for ways to save money because we have experienced some changing in our lives with loss of jobs etc. I found the best sites for finding creative ways to give gifts in a jar! I love gifts in a jar....something about just this simple gift and the cute labels (made with the circle & Scallop dies etc.) and tags you can put on them just makes me smile. I think homemade gifts are the best and people appreciate the simplicity and the special time you took to make something for them. I myself love to get homemade gifts. 

Here is a few great sites to check out ideas for the gifts in the jars!!
1. Indulgy  there is so much to take in from this site! Things you just don't think about using for a gift. 

2. Here is a great site "Tip Junkie" to show you some ways to save money and show someone you love them or are just thinking about them. These pictures are from the site I linked as well.


Thank you so much Emma for giving me this opportunity each month. I love Emma's products and enjoy making something to share and I enjoy searching for useful tips and hope that you find some of them very useful. Hugs to Emma & Aaron and hope he is getting better day by day!

Thursday, July 26, 2012

Guest Designer: Amy!

Hello!  This is Amy from Scrapping Mommy, and I have a fun get well kit to share with you today.  I thought it would be handy to have a few of these on hand for when I have friends or family that get sick this fall and winter.


For my project, I used the Bloom Where You Are Planted and Pain Pain Go Away stamp sets.  I cut the card and the container with my Cricut and the new Artiste cartridge.  I added some white pen stitching to both the card and the container edges and tied them up with some ribbon and bakers twine from The Twinery.


I filled the container with some cough drops, kleenex, hand sanitizer, hand lotion, chapstick, and a little tag that could be used as a bookmark.  The tag is cut with the Tag Dies and I heat embossed a flower from the Bloom Where You are Planted stamp set onto the blue cardstock.


How wonderful would it be to receive this when you weren't feeling too well??  I know it would really make my day!! Hugs, Amy

Wednesday, July 25, 2012

Guest Designers: Jeanne & Kim S.!

Good morning, My Creative Time fans! Jeanne here, from Jeanne's Paper Crafts, as a guest designer while Emma is away taking care of her family. Take care Emma...we got this! :)

On my card today, I am using one of My Creative Time's earlier stamp sets, 100% Sweetness. It is actually one of My Creative Time's Valentine sets, but hey...you can use these sentiments at any time!


The hexagon card base is a shape in the Silhouette Library. I duplicated the shape, flipped it and then welded the two of them together to create the base. It measures just under 5 1/2 inches in width, and a little less in height, but I don't recall the actual measurement. I cut it out in PaperTrey Ink Kraft cardstock. To create the top layer, I used the internal offset feature and cut it out in My Mind's Eye Rosy 6x6 paper stack.

I found this adorable Frog Prince SVG file designed by Lisa Norris over at Pretty Paper, Pretty Ribbons. Isn't he just the cutest?! He was cut out in Core'dinations cardstock. The pattern paper is also from the My Mind's Eye Rosy stack. It has some of the cutest papers in it! I really love all of the new papers from My Mind's Eye, it's quickly becoming one of my favorite paper companies. :)


Supplies:
PaperTrey Ink Kraft, White, and Vintage Cream cardstock
My Mind's Eye Rosy 6x6 paper stack
My Creative Time 100% Sweetness
Silhouette Studio Library (Hexagon)
Pretty Paper, Pretty Ribbons Frog Prince SVG file

Well, that's it from me today! Don't forget to stop back by tomorrow for another super cute My Creative Time project!  

And now, a project from Kim:

Hello, this is Kim Score from Paper Punch Addiction and I'm excited to be sharing this new technique with you while Emma takes some time off to care for her son.  Today I'm going to show you how to create what I call a "Showcase" card.  This is a modified easel card which has a popped out frame in front of it and another popped out element in front of the frame.  This technique can be modified in so many ways to showcase different kinds of elements.  For my card, I used the Fly Away With Me stamp set paired with the Fly Away With Me die and Fly Away With Me Sentiments.  The stamps and dies all coordinate beautifully!


Please visit my blog to download the step by step tutorial.  Thanks!

Tuesday, July 24, 2012

Guest Designer: Cathryn!

Good morning, this is Cathryn from In the Pink.  Today I am guest designing for Emma!  So happy to help fill in for such a sweet lady!
I have a bunch of projects for you today, all with at least one thing in common.  They use some of Emma's dies to make flower embellishments!

My first project is a card I made with the Fun Pockets stamp and die set, the Floral Sentiments stamp set and the Flower Petal die.  I used an epoxy paperclip and the Flower petal die to make a much prettier clip to put on the pocket.  It can be removed and used separately.


The next projects are made from plain flip flops I purchased at Target.  I dressed them up with the Flower Petal and Scallop circle dies and some felt from Papertrey Ink.


I used some heavy duty quilting thread to sew each flower together and then onto the flip flops.


I made these flowers using the stitched circle die.  I cut the felt at each scallop about 3/4 of the way to the center.  The middle flower has one layer from the Flower Petal die on top.

This project is a bookmark I made using a Jumbo paperclip and one of the same flowers from the above flip flops.


I used a needle and thread to whip stitch the flower on to the large clip, then I fabric glued another felt flower over the back to hide the stitching.


Here are the paperclips before I added the flowers.

Supplies I Used:
Fun Pockets stamp and die set, Scallop and Stitched Circle dies,
Flower Petal die and Floral Sentiments stamp set  -  My Creative Time
Lost and Found Two paper pad  -  My Minds Eye
Fine Linen Card Stock and Holiday Mix Vintage Buttons  -  Papertrey Ink
Lemon Tart, Raspberry Fizz and Blueberry Sky Felt  -  Papertrey Ink
Paperclips  -  Walmart
Flip flops  -  Target
3-in-1 Advanced Craft Glue  -  Beacon Adhesives
Pearls from my stash

That is it for me today!  I hope you enjoyed my post and found some useful ideas!  Thank you to Emma for creating such fabulous products for us to use!  Have a great day!!!
Love and Hugs,
Cathryn :)


Monday, July 23, 2012

Guest Designer: Cassandra!

Hello everyone!  This is Cassandra from CREATING with COLOR by CASSANDRA, and I'm filling in for Emma today while she continues to spend time with her family during her son's recovery.  It's been several weeks since this whole thing started, and I can only imagine how difficult this has been for everyone in her family.  So I wanted to make another card for Emma to continue sending her lots of love and support and let her know just how much we all care.


This is a 6x6 card, which I think is a great size when you are creating a scene.  The card base is made with kraft colored cardstock from Recollections.  And I did some faux stitching along the borders of the card with a black ~ Zig Writer Pen.


This wonderful hot air balloon is made with the recently released MCT ~ Fly Away With Me stamp set and the MCT ~ Fly Away With Me Dies.  This super fun hot air balloon is perfect for paper piecing!  I used my favorite Doodlebug Designs ~ Petite Prints patterned paper.  The polka dots and the grid paper are the two different sides of the same sheet. The red accents on the balloon and the balloon basket are made with Recollections ~ cardstock.  For some dimension, I added pop dots behind the hot air balloon.


For the sentiments, I mixed two different stamp sets.  The "Sending you" is from the MCT ~ Fun Pockets stamp set. **It's actually just a portion of the full sentiment that says "Sending you a pocket full of."  I just taped off the words that I didn't want to use.  The "Love" is from the MCT ~ Floral Sentiments stamp set.  **Once again, it's only a portion of the full sentiment that says "With Love..." and I just taped off the parts I wasn't going to use.  The inks are black ~ Ranger Archival Ink and Ladybug Red ~ Memento Ink.


One of my favorite parts about this card (besides the hot air balloon of course) are the clouds.  These wonderful clouds are cut with the cloud dies in the MCT ~ Fly Away With Me Dies. There are two different sizes like you see here.  And they have Emma's wonderful signature stitching around the edges. LOVE IT!!!  The paper for the clouds is simple Georgia Pacific ~ white cardstock from Walmart.  I added some pop dots underneath the little cloud on the right for some extra dimension and to show a little movement in the scene.  The pretty blue with white polka dots patterned paper is from the Bella Blvd ~ Baby Boy collection.  


Another one of my favorite parts (ok, I just love the whole card...lol) are the little hearts.  I used the tiny little heart stamp from the MCT ~ Happy Mail stamp set.  I stamped them all with Ladybug Red ~ Memento ink and then cut them all out by hand and placed them randomly to look as if they are falling from the balloon basket.  The paper for the grassy hills is from the Coredinations ~ Vintage collection.  I used the old Creative Memories ~ Wavy Trimmer - which is just perfect for making mountains, hills and water.  I also added a little green chalk to the tops of the hills for a little extra dimension and definition.


Well, that's it for me.  I hope you liked my simple little card today.  Thanks for stopping by.  We will see you all again tomorrow.  And make sure to leave a comment full of love so that we can continue to support Emma through these last few weeks of Aaron's recovery.  He is such a little trooper!!!

Saturday, July 21, 2012

Guest Designer: Katie!

Hi, this is Katie from Crafting with Katie.  I'm so thrilled to be guest designing for My Creative Time today!  I was able to hang out with Emma and her boys last week, and I can tell you first hand that Baby Aaron is doing great!  Emma is focusing her full attention on bringing him back to full health, so the guest designers are trying to keep you entertained in the meantime!  I have a fun project for you today, but first I want to remind you that Emma is having a customer appreciation sale this weekend!  Everything is 20% off, including sale items!  Be sure to head over to the store to check it out.


Today I have a fun baby card for you that has a pop-up surprise inside!  I started with an A2 size aqua card base and added a brown layer and then a rustic white layer that was run through my Cuttlebug with the Papertrey Ink Woodgrain Impression Plate.


I used my Gypsy to alter some wooden blocks from the Cricut Wrap It Up cartridge, using letters from the A Child's Year cartridge.  Check out the video further down in this post for the how-to details.


This sweet sentiment is from My Creative Time's All Star Baby stamp set.  I just love this set; it's full of precious sentiments.


Now, for the fun part!  On the inside of the card I added a pop-up baby carriage that I made using the Everyday Pop-Up Cards cartridge.  I know a lot of people have difficulty with the lack of directions on this cartridge, so I made a video showing how to assemble it:


I added another little sentiment from All Star Baby on the inside.  Don't forget to head on over to the store for the sale!


Customer Appreciation Sale


Products used on this card:
Related Posts with Thumbnails